How to create GST return in one single entry in ERP software
- Jun 13, 2018
- 3 min read
In this topic we will discuss how to do all in one single entry for creating GST returns.

Sometime the businessman has not enough time to manage each bill. Thus in GST ERP software it will be easy to maintain account with GST reports and billing in single entry.
LET US START

First of all we will create GST voucher of purchase. Click on GST voucher in entries menu.

Click on new.

The software will select date automatically. Now select credit in terms. Click on plus sign adjacent to party block.

Now fill party name in account name. As we purchase from party thus we will select supplier in group block. Now fill state of party. Now select within state B2B party in party type because party has GST number. Now fill the GST number. Then click on save.

Select party and type. Suppose we want to select purchase 18% but this purchase is not in list of on account of block. Thus to create a new account we will click on plus sign adjacent to on account of block.

Now fill purchase 18% in account name and select purchase in group. Select credit and after filling all details of supplier click on save.

Now select purchase 18% in on account of block. Then press enter and select bill number.
Now press enter and select tax %. Now fill HSN code and taxable amount. The tax will calculate automatically. After filling description click on save. After doing this entry your reports, books and trading account will be automatically maintained.

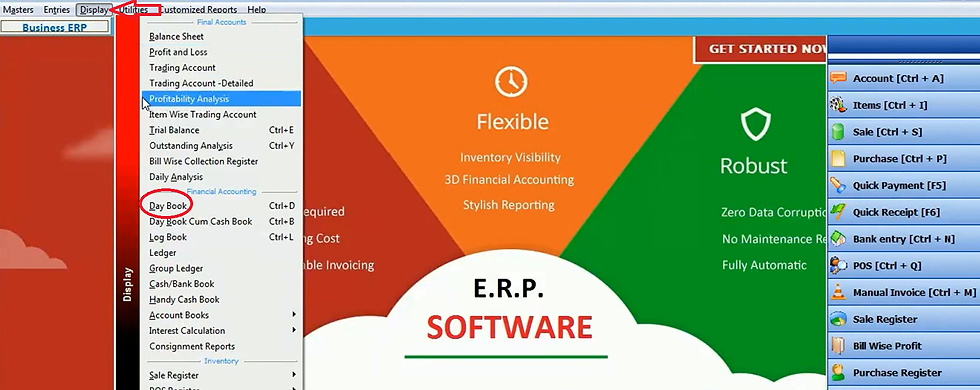
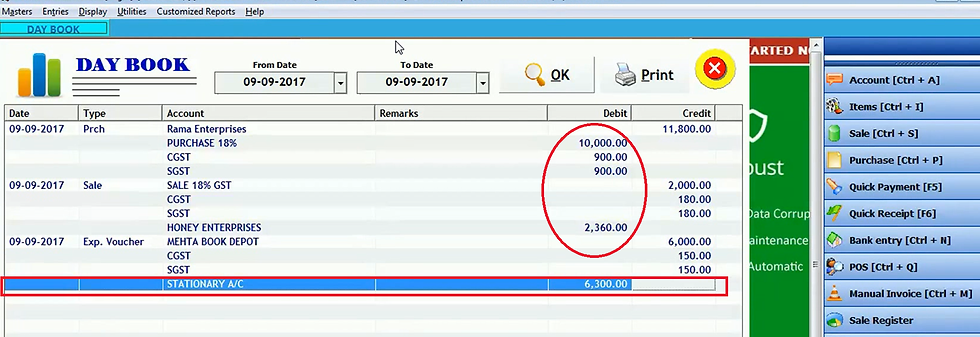
Let us check day book by clicking on day book in display menu.

Select date range and click OK.

Thus the day book will maintain automatically.

Now we will check trading account by clicking on trading account in display menu.

Now click OK then software will display trading details.

Now we will check purchase GST report by clicking on GSTR-2 in GST report in display menu.

Click on purchase invoice details.

Select date range and click OK.

GST report generated automatically as input purchase, sale, debit notes etc in a single entry.

Now we will do sale GST voucher entry by clicking on GST voucher in entries menu.

Click on new.

Select sale in entry as we are doing sale GST voucher entry and credit in terms. Now click on plus sign in party block.

Fill party name in account name and select customer in group as we are selling the product. Select debit, state, party type and fill GST number. After filling all details click on save.

Now select party and type. Now click on plus sign in on account of block.

Now fill sale 18% in account name, group, party type and GST number. After filling all details click on save.

Now select on account of block. Then press enter and select tax. Then fill taxable amount. Software will automatically calculate and then click on save.

Now we will check GST-1 IN GST reports in display menu.

Click on B2B taxable invoices.

Select date range and click OK.

Thus software will display the GST report and you can create Json file of return.

We will create GST voucher by clicking on GST voucher in entries menu.

Click on new.

Suppose you purchase stationary for your office then select expense voucher in entry and select credit in terms. Now click on plus sign adjacent to party block.

Fill party name in account name. Now select sundry creditors in group and after filling all details click on save.

Now select party and click on plus sign adjacent to type block.

Fill NON ITC URD purchase in voucher title and select purchase in account head to post. Now select local and retail invoice. Then click on save.

Now click on plus sign adjacent to type block.

Fill ITC URD purchase in voucher title. Select purchase in account head to post block. Select local and tax invoice then click on save.

Now select type and click on plus sign adjacent to on account of block.

Fill account name and indirect expense in group block. After filling all details click on save.

Now select account and press enter. Then select tax and taxable amount and tax will be calculated automatically. Click on save.
Click on day book in display menu.

Select date range and click OK.

Thus day book display all credit and debit details. If you want to modify any detail then double click it.

Suppose we want to change type and account. After making changes click on update.
As you change type from ITC to non ITC it means you do not claim GST means if you pay GST you will not get reverse charge of it. Thus our debit will increase because we will not get GST return in case of non ITC. There are some accounts on which GST do not implies such as salary account. Thus in case of these accounts you need not to create GST voucher.


Comments