How to manage Items/Products In ERP Software
- Apr 4, 2018
- 4 min read
Updated: Apr 14, 2018
Today we will discuss how to do item (product) entry in business ERP software.

We will also discuss which points to be in consideration while creating product master of sold and purchased products. In this topic all fundamentals of product master entry will be discuss. For eg. How to manage an item which is of different MRP etc.

First of all click on item in master menu. You can also click on item on right hand side list.

These are already created items. If you want to create a new item click on new.

Suppose we deal in hardware. So, we will select hardware name in item name. In short name we will give short name to the item so that it will easy to search the item by it’s short name. Press enter. Now fill the HSN code of the item. If you do not know the HSN code for that particular item then click on question mark adjacent to HSN code box. If you do service instead of sale or purchase then you will fill SAC code. .

Fill the GST charged on the item. Select the company of that item. If you want to add new company click on sign of plus. There fill the item company and click on save. If you want to modify the company name. For eg. Suppose you want to write company name in capital letters.

Then click on pencil sign adjacent to plus sign. Now write the company name in capital letters. Now click on update.

Thus this company name will add in company list.
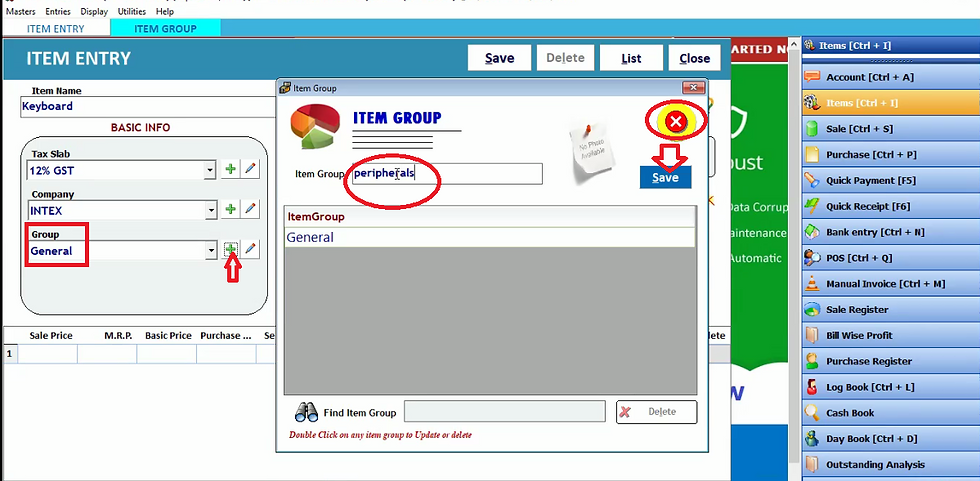
If you want to add this item in a group then you can create a group in the same manner in which the company created. Click on plus sign. Fill the item group and click on save.
Thus this group name will be added in the group list.

Now we will create one more group. Again click on plus sign. Now fill the group name in item group and click on save. Thus this group name will be added in group list. Now select group in group list. Thus the benefit of creating group is that you can check how much you have sold the group means-how much have you sold the peripheral and internal parts. Now press enter.

Now select the primary unit from primary unit list. Primary unit means in which unit you sell the product-in pieces, bags, Kg, ltr etc. Now press enter. Now fill sale price and MRP of the item. Fill the basic price of item means the cost we had to pay for that item. Now fill the purchase price means the total cost obtained after adding the basic price with extra charges such as tax, freight and labour price. Suppose extra charge is 50 rupees and basic price is 800 rupees then the purchase price will be 850 rupees. Suppose after buying this item extra expenses have to done that is 20 rupees then after adding this 20 rupees to 850 rupees we will get self value price . Now we will fill self value price that is 870 rupees and press enter. Then fill the minimum sell value below which we can not sell the product so that we do not get loss.
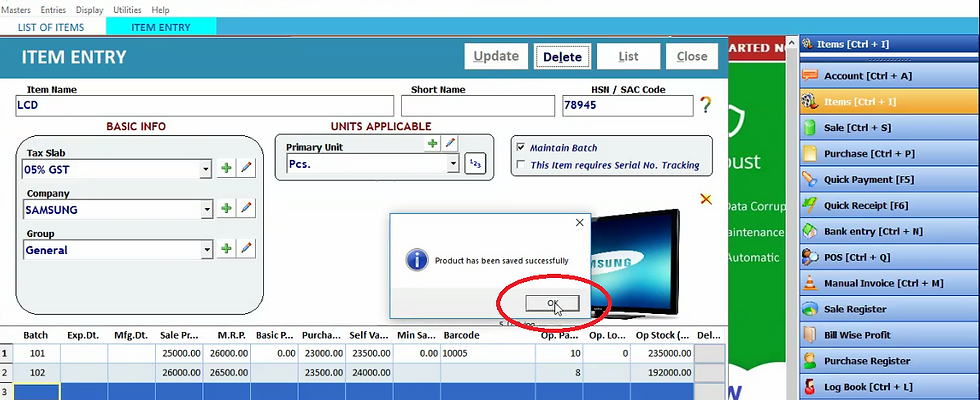
Fill the barcode of item by scanning using barcode gun. In case your barcode gun is not working then you can fill the barcode manually. Press enter. In opening packs we will fill the stock of that item we have. Press enter. Press enter again and you will get stock value of available stock automatically. This stock value price is automatically calculated on self value price of that item. Now press enter. Click on save.

Click OK. Thus in this way one item has been created.

To create an item we will click again on item on right hand side list.

Click on new.

Fill the item name, short name, HSN code, tax slab, company of item, Group and primary unit. Suppose we select box in primary unit then the item will be in pieces in that box therefore we will click on sign adjacent to primary box as indicated by arrow in above picture. Now fill the alternative unit as here we will select pieces. In conversion factor we will fill the number of pieces in a box. In price per we will select that unit in which we want to purchase. Suppose we want to purchase the item in pieces then we will select pieces in price per. Press enter
Now fill the selling price, MRP, basic price, purchase value, self value, minimum sale price, opening packs and in opening loose we will fill the number of pieces of item remained in box. Press enter. You will get the stock value of available stock automatically which is calculated on self value price. Now press enter and click on save.

Click OK. Thus in this way you can create unit of any item.

Now close it by clicking on close.
Sometime there is change in MRP of item and manufacturing and expiry date. Thus it is time consuming to create such items again and again. To solve this problem we have option of batch. We can create different batches for same item.
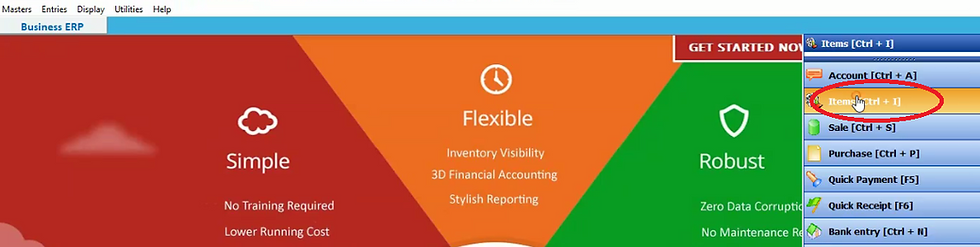
Thus to do this we will click on item on right hand side list.

You will see list of items we have created. Then we will double click on that item for which we want to maintain batches.

Here we will fill it’s HSN code, company, group and primary unit. Now to manage batch tick the maintain batch block. Now fill the batch number. Other details of selling price, purchase price etc is already filled. Then we can fill here stock in opening packs. Press enter. You will get the stock value automatically.

If you purchase one more stock of same item and that item price is different to previous one. Then press enter

and fill the batch number, selling price and all details and press enter. Thus in this way as you purchase new stock you can create new batch of that item. Now click on update.
Now click OK.


Comments